Friday, February 27, 2015

Chaleur B Chocolat; Delicate and Buttery Chocolate From Bean to Bar

Smooth. Delicate. Buttery. These are the three words that come to mind when I think of Chaleur B Chocolat's chocolate bars. Dany Marquis, the owner of this family business that makes chocolate from bean-to-bar in Quebec, says that they do not want to rush on the volume because "quality is our priority." And a focus on quality is certainly apparent upon first taste of Chaleur chocolate.

Dany Marquis started out in Quebec as a coffee roaster in 2005, called BrĂ»lerie du Quai. In 2007 he took a technical chocolate training course at Weiss chocolate factory in Paris, and just recently decided to start making chocolate as a complement to his coffee business. This coffee-roaster background is similar to another Canadian bean-to-bar chocolate maker Dave Cook, who started making chocolate in London, Ontario under the Habitual Chocolate brand, after having successfully built up Fire Roasted Coffee.

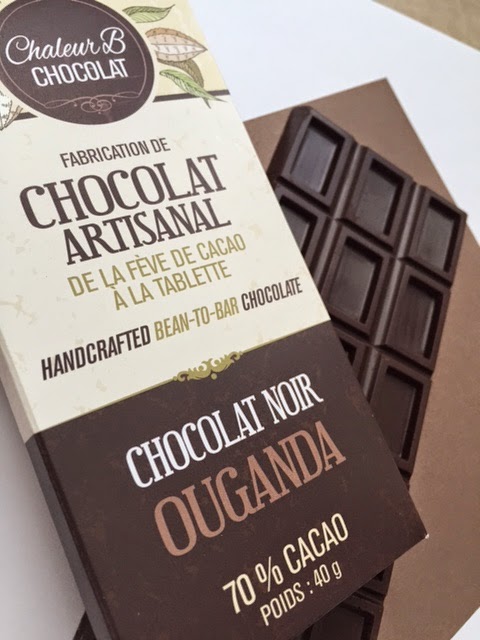
I purchased three chocolate bars from Chaleur B Chocolate: a 70% Ouganda (Uganda) origin dark chocolate bar, a deep 50% milk chocolate bar also made from Uganda beans, and a 'Chocolat Blanc' (white chocolate) bar made with Madagascar vanilla beans. They arrived earlier this week and I have already made my way through most of each bar. All three were delicious.

The reasons for their deliciousness are as I described above. The chocolate bar itself is thin, making each piece delicate so it breaks and melts in the mouth nicely. The pieces are very smooth, so clearly a good conche was done. Also, all three bars had a nice buttery texture and taste, which immediately indicated that added cocoa butter was significant in creating this overall taste experience.

Mr. Marquis told me that the Uganda cocoa beans were of the Forastero variety, a bean type not normally known for fine flavour, however these beans are very flavourful. The Ouganda 70% bar has a nice rustic, and perhaps smoky and slightly sweet chocolate flavour. The 50% milk chocolate bar is also flavourful, but has a nice, smooth profile with low acidity.

Chaleur B Chocolat's white chocolate bar is smooth and delicious with a strong vanilla bean and cocoa butter flavour. It is sweet, but not sickeningly so in the way that commercially sold white chocolate can taste. Of all the white chocolate bars that I have tasted, this is now one of my favourites.

Mr. Marquis also makes chocolate with single origin beans from Madagascar (Ambanja origin), Venezuela (Ocumare), and Ecuador Camino Verde. For now, you can purchase the Uganda bars, the white chocolate bar and a Mokaccino bar on the website at www.chaleurb.com. Chaleur's chocolate will also be available in the coming weeks at La Tablette de Miss Choco in Montreal (http://latablette.ca/).

Here are the package details from the three bars that I tasted this week by Chaleur B Chocolat:

Chaleur B CHOCOLAT
Carleton-sur-Mer, Quebec, CANADA
www.chaleurb.com

Chocolat au Lait OUGANDA, 50% Cacao, 40g
Ingredients: Cane sugar, cacao beans, cacao butter, whole milk powder, vanilla.
May contain traces of flour, dairy and nuts.

Chocolat Blanc Vanille de Madagascar, 40g
Ingredients: Cacao butter, cane sugar, whole milk powder, vanilla.
May contain traces of flour, dairy and nuts.

Chocolate Noir OUGANDA, 70% Cacao, 40g
Ingredients: Cacao beans, cane sugar, cacao butter.
May contain traces of flour, dairy and nuts.

Thursday, February 26, 2015

The Ultimate Dark Chocolate Coconut Fudge Recipe

Fudge is one of those treats most often seen at touristy shops, candy stores and ice cream shops during the summer season. It can also be found at the grocery store for those times when you get a sudden craving for the smooth, sweet stuff.

I always preferred the slightly crisp fudge made by my mother's friend, which turned up on our doorstep each year on my mother's birthday (which I usually ate most of). Someday I will get the recipe for that fudge. However, today I am sharing a new personal favourite fudge recipe: Dark Chocolate Coconut Fudge.

I often make an attempt at buying the store-bought fudge. But nearly every time, I find myself putting the fudge back on the shelf before I leave the store. Why?  Ingredients.

In addition to the insane amount of icing sugar added to most store-bought fudge recipes and artificial vanilla flavouring, there is one ingredient that I will not tolerate in my food: hydrogenated vegetable oil. Whether it is partially hydrogenated or fully hydrogenated, or cottonseed, soybean, palm or kernel, I don't want it. The process that the oil has gone through results in a thicker oil that makes it harder for our hearts to pump blood through our systems (ref). It increases our LDL (bad cholesterol) and decreases our HDL (good cholesterol) (ref). So until food (and fudge) manufacturers get the picture and take it out, I will make my own fudge from scratch.

This recipe has all the deliciousness of a dark chocolate fudge with a nice fun crunch, but is much more natural than the store-bought stuff from touristy ice cream shops. Sure, there is some fat in it, but just try to remember that portion control is important.  This fudge freezes well, so you can cut it into pieces, seal in plastic wrap and freeze them individually. Thaw and enjoy a piece every day!

Recipe: Dark Chocolate Coconut Fudge with a Crunch

Make 12 large pieces (43g/1.5oz each), or 24 small pieces (22g/.75oz each).

You need:

  • For the fudge:
  • 3.5 oz (100g) coconut oil
  • 12 oz (340g)  of 70% dark chocolate, chopped
  • 1/2 cup (50g or 118 ml in a measuring cup) coconut sugar (you can use regular sugar, if you like)
  • 1 cup (30g or 237 ml in a measuring cup) of crisped rice cereal (I used the brown rice kind), or chopped, roasted almonds if you prefer
  • The scraping of 1 vanilla bean or 1/4 tsp of ground vanilla bean (not the liquid extract) - optional

For the topping:
  • 1/4 cup (25g) of unsweetened medium coconut flakes (again, use sweetened if you like)
  • 2 oz (57g) of dark or semi-sweet chocolate shaved, or finely chopped

Instructions:

1. Line a loaf pan (about 9" x 5") with plastic wrap (see below for tips on other pans that you can use) and set the pan aside.

2. Place 10 ounces of your chopped chocolate in a medium stainless steel bowl (for a double boiler) or a glass or plastic mixing bowl (for the microwave). Reserve 2 ounces and set aside.

3. Melt the chocolate in one of two ways:

a) Over a double boiler (place your chocolate bowl over 1" of nearly simmering water in a small pot of water). Stir the chocolate with a dry wooden spoon.  Ensure that no water gets in the chocolate, not even a drop and that your tools are dry before you start. Stir until melted to a temperature of 120 degrees Fahrenheit.

or

b) Melt the chocolate in the microwave for 2 minutes on half power (in glass, ceramic or plastic bowl only). Remove, stir with a wooden spoon and then microwave for 5 to 10 second intervals until entirely melted to a temperature of 120 degrees Fahrenheit.


4. While the chocolate is melting, place your coconut oil into a microwave-safe dish and microwave for 40 seconds, just until melted.  Remove and add the sugar to the coconut oil and stir until mixed. Tip: for a smoother fudge you can whirl the melted coconut oil and coconut sugar in a single-serving blender (I used the Ninja smoothie attachment, but the Magic Bullet would work, or a an immersion blender). Set aside.

5. Once your chocolate is 120 degrees F, you need to temper it. The simplest method is to remove it from the heat and immediately toss in the 2 ounces of chopped chocolate that you had reserved. Stir until smooth. Continue to reduce the temperature further by either placing over a bowl of ice water (or stirring the bowl of chocolate while it rests on the shelf inside your fridge - but this takes longer). Cool to about 82 to 86 degrees.

6. Add your coconut oil and coconut sugar to the chocolate. With a spatula, stir the chocolate mixture over the ice bath again until you reduce the temperature further, to a few degrees above room temperature or just as you notice it thicken. Work quickly and add the crisped rice cereal, and then immediately pour into your pan and spread out quickly.

7. Sprinkle the coconut topping over the fudge and gently press into the fudge so it sticks.


8. Place the fudge in the refrigerator for 1/2 hour to set. Remove from the fridge and gently remove from the pan by holding the sides of the plastic wrap to lift up and out onto a cutting board. Cut into 12 large square pieces or 24 small pieces.


Pan Tips: If you do not want to use a loaf pan, or simply want to get more creative with your fudge shape, you can line a box lid if you do not have one, or use a round cake pan.  I made this recipe once in the Simply Baked disposable paper baking pans and gave it as a gift to someone. If you pour the fudge a few minutes earlier (i.e. before it thickens) you can also pour it directly into cupcake papers.

Don't want to temper chocolate or don't have a digital thermometer?  Try the Coconut Fudge recipe that I reviewed yesterday! It is silky smooth, but just be sure to check my tips and tricks for making it easier to handle. Find the review and link to the recipe here: http://ultimatechocolateblog.blogspot.ca/2015/02/coconut-fudge-recipe-good-recipe.html.

Wednesday, February 25, 2015

Coconut Fudge Recipe; Good Recipe, Personal Disaster


A few weeks ago, I saw a Whole Foods recipe online that inspired me: 'Coconut Fudge'. It looked delicious, all natural, and rich in the way that I like dessert to be. So I decided to try it. As you'll see below, I struggled with this recipe a little bit, mostly because of brain-freeze on my part, and partially because of the recipe itself. But it was no loss! Here is my review along with tips and recommendations to make this the best 'fudge' possible.

Recipe being reviewed: Coconut Fudge Recipe on the Whole Foods Website

Link to recipe: http://www.wholefoodsmarket.com/recipe/coconut-fudge

Quick  Review Notes:

  • The result is a very silky-smooth dessert with a truffle-like texture.
  • Delicious if you like the taste of coconut milk or cannot have dairy, but if you prefer a cream truffle, this might not be your thing.
  • It is extremely difficult to slice because it is so soft, and you really need a spoon or fork to eat it, not like regular fudge.
  • A little on the sweet side because of the chocolate chips. To suit a Paleo or low-sugar diet, change the sugar in the recipe to to 'coconut blossom sugar' or change your chocolate to a 70% or 80% dark chocolate.
Recommendations:

Since it is so difficult to slice, I recommend the two following changes:

1. Press a coconut-&-flaked chocolate mixture into the sides to make it easier to pick up. Because it is so soft, pour your fudge mix into a pan lined with plastic wrap, or a waxed paper or parchment-lined pan, so that you can extract the entire dessert easily. Once it sets in the fridge, place a plate or piece of waxed paper over top of the coconut topping then flip the entire thing upside down. Sprinkle more coconut topping (I mixed finely chopped dark chocolate with medium unsweetened coconut flakes, which made a really delicious topping) on the back side of the dessert and press it in.  Then, carefully cut 1" square slices and dip all sides of each piece into more of the coconut/chocolate topping. This makes each piece easy to handle. It also adds a nice delicious texture to the outside. Serve in mini or small cupcake papers.

2. Turn it into a coconut-chocolate pie! You can also pour the 'fudge' mix into a tart shell, such as a baked coconut crust, to make it easier to slice and serve. For a crust recipe, try the coconut pie crust that I provided in one of my PIECAKEN recipes here: http://piecaken.blogspot.ca/2014/07/cherry-pie-in-chocolate-truffle-cake.html.

3. Reduce the coconut milk in the recipe to half of the recommended amount.


My Recipe Experience:

It is so cold outside that I think I have been experiencing brain-freeze lately. I am usually very good at following recipes, but something about this recipe caused me to take three tries and a lot of wasted chocolate in order to get it right.   

The first attempt went amuck when I read the ingredients incorrectly and used only half of the chocolate.  I could have saved it by rolling it into balls and dipping them into melted chocolate to make chocolate truffles. BUT, I had already sprinkled coconut flakes on top and rolling balls would have ended with a mess and an unpleasant texture for a truffle.  I tried freezing it so I could slice it and dip entire squares into chocolate - but even after freezing, it was still too soft and these ended up being mis-shapen oddities with ends that stuck out all over the place and refused to dip. Most of it was wasted, or wasted caloric intake on my part.

On the second attempt, I fell into old habits. Without even thinking, I started to melt and temper the chocolate over a double boiler because that is how I start most creations these days. But this recipe was the simple version, where chocolate need not be tempered. So instead I ended up using the tempered chocolate to make a delicious chocolate fudge of my own creation, inspired by some of the elements of the recipe that I was following. You can find this recipe in the next post.


Finally the third try was perfect. I followed all the steps and created a lovely truffle.  However, it is still a little on the soft side to be called 'fudge', but once I carefully sliced each piece and then dipped them in a combination of coconut flakes and shaved chocolate, the pieces were much easier to handle and eat. I packaged these up in cupcake papers and they look delicious!

Saturday, February 21, 2015

Take your chocolate creations to a darker place with Belcolade Uganda 80%


Couverture chocolate is used by all chocolatiers to make beautiful confections, chocolate bars and chocolaty treats.  It has a slightly higher cocoa butter content, which gives a nice shine and makes the chocolate easier to work with when enrobing fruit, nuts and other foods. Couverture is widely sold and fairly easy to find, once you go looking for it.

What is rare though, is to find a couverture chocolate with 80% cocoa solids in Canada, or in North America for that matter.  I have been searching lately for a bulk chocolate in the 80% range and have only come across one in Canada: Belcolade 'Noir Collection Uganda 80%'.  I found this 80% dark chocolate couverture through Chocolat Chocolat in Montreal, and I was able to order it online and have it shipped to me in Northern Ontario. There are a few others available on other continents (see below for a list).

When you first open the bag, there is an aroma of real (not artificial) vanilla.  The texture is very smooth, as Belcolade's always is. And for the flavour, it is a nice straight-up chocolaty flavour that is just a little earthy, but also, in my opinion, fairly neutral with no overpowering regional flavours (although Belcolade's website says it has a 'gorgeous taste of hummus and mushrooms').  It is definitely not too bitter, and lacks acidity compared to a lot of 80% or higher dark chocolates, which can be very acidic.

After working with this chocolate, I found that it tempered easily and was quite nice to work with.  I used it in my Salted Dark Chocolate Pecan Bark recipe (simply replace the 70% dark chocolate in the recipe with the 80%) and found that it tasted delicious, pairing surprisingly well with salt. Very dark chocolates (over 70%) can often taste too bitter when paired with salt, which is why you'll see Lindt and other large brands use a dark chocolate closer to 50% when making a salt-and-chocolate creation. However, I found this 80% so smooth with just the right amount of cocoa butter to be perfect for a sweet-and-savoury pairing.

So if you are in the chocolate business, and you intend to go darker this year to serve Paleo-friendly clients or diabetics who like a little dark chocolate, or if you just want to make healthier chocolate creations at home, Belcolade's Uganda 80% is worth a try. Also, there is no soy lecithin in this chocolate, so everyone really can enjoy it.

As for price, it was comparatively reasonable for couverture. I paid about $17 CAD for 1 kilogram of Belcolade's Uganda 80% dark chocolate. I pay about $18+ per kilo for other brands of organic dark chocolate couverture, so given that this is not organic, it is reasonable.

Here are the package details from the chocolate that I reviewed today:

Belcolade 'Noir Collection' Uganda 80, min. cocoa solids 80,0%, 1kg
Belcolade NW (Belgium)
www.belcolade.com
Ingredients: cocoa mass, sugar, cocoa butter, flavouring: vanilla.


Other 80% dark chocolate couvertures available across the world:

  • Amsterdam-based Original Beans makes an organic 80% dark chocolate couverture made from "the world's rarest cacao" (ref). Check them out online a here.
  • Mesocacao also makes one. Click here to learn more.
  • Austrian Zotter Chocolate  also offers an 80% couverture available on the UK-based Chocolatiers site. Zotter also has a facility in the U.K. and in Shanghai. www.zotter.co.uk

If you know of any 80% or higher chocolate covertures that are not listed above, please let us know in the "Comments" below!

I made some delicious almond clusters with this couverture. 


Making Chocolate Nib-to-Bar at Home: Experiments in Chocolate Origins and Aging

I recently received a small package of Madagascar cocoa nibs from friends who had visited Soma Chocolatemaker in Toronto. So instead of snacking on them or adding them to a savoury dish, I decided to make my own Madagascar single origin chocolate. If you have read my article about making chocolate from the nib, rather than from bean to bar, you'll know a little about how to make chocolate at home (Click here for the recipe and instructions to learn how).

I wanted to experiment by making Madagascar origin chocolate with Soma's roasted nibs, and then following the exact same recipe a second time to make Peruvian origin chocolate from other organic roasted nibs that I had on hand. My result was two very different tasting chocolates.


I used the coffee grinder to grind the chocolate into a liquid, and because of that I was forced to add a little melted cocoa butter to each batch. My grinders are getting a bit old, so admittedly the chocolate was on the crunchy side. 

Upon first taste, I was delighted with the Peruvian chocolate that I made, and completely appalled by the Madagascar. Why? Although the Madagascar chocolate was slightly smoother than the Peruvian, it was so acidic that is was nearly unpalatable. The Peruvian, on the other hand, was sweeter and although there was some acidity, it was mild compared to the Madagascar chocolate.

So in order to save the Madagascar chocolate, I decided to see if there is any truth to this 'chocolate aging' process that I hear so much about. Many chocolate makers believe that an important part of process of bean-to-bar chocolate is to age the chocolate for at least 30 days. But not all do this. So I decided to experiment with the few pieces that I had left to see if that would help.

I waited (not so patiently) for a month and what do you know? After 30 days, the Madagascar chocolate became more palatable and all the common fruity flavours that can be tasted from that origin became identifiable. The Peruvian chocolate got even better, with a slight floral and sweet flavour and very low acidity.

So what did I learn? Aging certainly helped both origin chocolates, however, it was not necessary with the milder Peruvian batch, and it was necessary with the Madagascar. I am sure that technique, better equipment and a good conche would have done more justice to the Madagascar beans. But from this experiment, it is clear that a good chocolate maker should assess their beans, and then adjust the aging accordingly.

If you want to learn more about aging chocolate, Ritual Chocolate has a great article on their website here: http://www.ritualchocolate.com/aging/.

Friday, February 20, 2015

Vietnam: A Trending Chocolate Origin

Chocolate made from Vietnamese cacao is clearly one of the 'trending' origin chocolates worldwide. Leading this trend was Marou, a chocolate-making team of French men living in Vietnam, who use cacao grown within that country to produce award-winning chocolate bars from bean to bar (see a previous article on Marou here). Marou's chocolate is very well made and it highlights the flavour profiles of various cacao-growing regions of Vietnam. And now, it seems that more and more craft, bean-to-bar chocolate makers are using Vietnamese cacao to make single origin bars.

Two of these producers are Palette de Bine, a Quebec-based craft chocolate maker, and ERITHAJ Chocolat, a French chocolate maker that sources beans from their own farms in Vietnam, but ultimately makes their chocolate in France. I purchased chocolate bars from both producers to see how they tasted, and to better understand the flavours of Vietnamese cacao.

Palette de Bine's Lam Dong Vietnam 72% chocolate bar is a very bold flavour combination containing fruity, blackberry and tart berry flavour, yet also woody and earthy. There is a nice mild acidity and a slight chalkiness, but so slight that it is not noticeable with every tasting. Regardless, I found it so complex and interesting that I kept going back for more.

Although the chocolate might benefit from added cocoa butter, the chocolate maker is committed to sticking with only two ingredients: cocoa beans and sugar. This commitment is commendable in this day and age of commercial producers adding artificial and unnecessary ingredients to chocolate. 

ERITHAJ's Ba Lai Chocolat Noir Vietnam 74% chocolate bar also has very bold blackberry flavour, and a red grape flavour (a bit like a fruity wine), but it is acidic and has citrus undertones.

ERITHAJ also makes a Vietnamese-origin Dark Milk chocolate bar called Mo Cay with 58% cocoa solids. An intense sour cream flavour is noticeable at first taste, with high acidity and possibly a little tobacco and spice. Like the 74%, it is not super-smooth in texture, but still a fine chocolate.

If you are looking to experience Vietnamese-origin chocolate for yourself, ERITHAJ's and Palette de Bine's chocolate bars, plus several of Marou's, can be purchased online at: www.latablette.ca.  You can learn more about France-based ERITHAJ online here, and about Quebec-based Palette de Bine here.

Aside from Marou and the two mentioned above, here are some other producers that are making chocolate from Vietnamese cacao:
  • Belcolade, a Belgian chocolate couverture producer, is now offering a Vietnam-origin chocolate with 73% cocoa solids from Trinitario beans, which is said to have a strong, acidic cocoa flavour, also with citrus, tobacco and woody flavours. (ref) View on the Belcolade site: http://belcolade.sitepreview.nu/def/en/product-range/origins/dark/vietnam-73
  • Chocolaterie A. Morin, a French chocolate maker, makes a Vietnam 48% Milk Chocolate bar.  In the U.K., find it on the CocoaRunners website here
  • Hotel Chocolat makes an 80% dark Vietnam origin chocolate from Trinitario cacao (find it here).
If you know of any other fine chocolate makers that are working with cacao from Vietnam, let us know in the Comments below! And what do you think of the flavor of chocolate made from Vietnamese cacao? Is it fruity, acidic, and citrusy with some woody and tobacco flavors, as I have indicated above, and as Belcolade has described their product? Or do you taste something else in single origin Vietnam chocolate? I'd love to hear your thoughts.

Wednesday, February 18, 2015

Sea-Salted Chocolate Caramel Tart; Recipe Review and Recommendation


At precisely the moment that I was looking for inspiration for a dessert for yesterday evening, I saw a tweet by Great British Chefs for a sea-salted caramel chocolate tart recipe, written by the famous chocolatier, Paul A. Young.  So I headed off to my commercial kitchen and followed the instructions and created something truly delicious.

This chocolate caramel tart is even better on the second day than it is on the first.  It was easier to slice today because it had more time to set.  Also, the salt really seems to shine on day two and the texture thickens just a little, which makes it seem richer and more enjoyable. But it is still soft, truffly and melt-in-your-mouth delicious. 

The crust is very similar to one that I regularly make for my customers now, and to the one in Chatelaine's tart recipe, but just a little delicate in comparison. It rolled out easily, and works exactly as the recipe had explained. And once baked, the crust had a nice shortbread flavour and a texture that crumbles in your mouth in a delicious way.

So what needed improvement? 


It really was a near-perfect recipe, except for these small things that I should mention:

If you want to use all the dough, you will need to double the filling: The recipe does not mention the size of the tart pans, so I chose my pan based on how much dough there appeared to be. It mentioned using 4 tart pans.  I only had two seven-inch pans and 30 three-inch pans, so I went with the two seven-inch pans. I had about the same amount of dough left over, but no filling, so I just wrapped and froze the remaining dough for the next time I want to make this recipe. Each tart can be sliced into 6 -8 pieces, so two tarts were the perfect amount for last night's dinner party.

Check your tart crust at 17 minutes instead of 25 minutes. The cooking time was different for my oven from the time specified in the recipe.  Because I make tarts on a shortbread crust weekly, I knew that 25 minutes seemed long for this crust.  So I set the time for 18 minutes, rather than 25 minutes. When I checked at 18 minutes, the tarts were already quite golden brown - any longer and they might have burned.  Perhaps it is just my convection oven that bakes the crusts faster, but just be sure to check yours at about 17 minutes to see if they are ready, or if more time is needed.

Use an online converter:  This is a British recipe, so if you are American, or even a Canadian who prefers 'cups', and you don't have a kitchen scale that converts easily between grams and ounces, you will need to use Google to search for online conversions to cups and ounces (from grams).

I recommend it!
Despite the small issues I experienced above, I overall give this recipe a 9 out of 10!  It truly was delicious and the added sprinkle of cocoa nibs on top was not necessary but made it a lovely gourmet chocolate dessert with a slight textural crunch.

Here is the full recipe link: http://www.greatbritishchefs.com/recipes/sea-salted-caramel-tart-recipe.

Monday, February 16, 2015

Struggling to stick to your 2015 resolution? Try Zazubean's 'nudie' 80% extra dark chocolate


Did you veer off your New Year-resolution diet this Valentine's Day long weekend? But you still haven't achieved your goals?  Well, its time to get back to that low-carb diet you were on by trying out some very dark chocolate!  This week I will be exploring the very darkest of the dark chocolate bars, which may be just the treat you need to stick to your healthy eating plan.

I'll start with Zazubean.  I recently got my hands on the British Columbia-based chocolate maker's 'nudie' chocolate bar. It has 80% cocoa solids and is made with cacao from Panama. But most interestingly, the 20% non-cocoa solids is coconut sugar, not cane sugar.

Many people are trying to reduce their cane sugar intake these days, including me.  Let's face it, it's all too easy to fall into the habit of eating cane sugar all day long. Instant oatmeal for breakfast (even the organic, gluten-free kind) contains cane sugar. Bread, waffles, peanut butter and jam also contain it. At mid-morning snack, a 'healthy' berry-on-the-bottom yogurt also has cane sugar. Then at lunch, a salad dressing, or anything with ketchup is another shot of sugar. That organic granola bar? Yes, it has sugar too. And BBQ sauce on your dinnertime steak? Yup. That's more cane sugar. 

So it's easy to see why reducing our sugar intake, and switching to alternate sweeteners might be a benefit to our health.  It's also easy to see why a popular chocolate maker like Zazubean would offer a product that uses coconut sugar.

So how did it taste?
When I saw Zazubean's bar, I was concerned that the chocolate would have a strong coconut taste, or simply be bitter and unpalatable.  That was not the case. Upon opening the package, I found that it surprisingly smelled like sweet chocolate. There was no hint of coconut sugar in the aroma and very little in the taste. The taste was also sweet for an 80%.

When trying it up against Belcolade's Uganda 80% (which I'll write more about later this week), Camino Panama 80% or even a bean-to-bar craft chocolate like Amma's 80% dark, it certainly seemed sweeter, and had less of a bitter cocoa flavour.  But I think this may be nicer for the average palate, and it can be a good chocolate for someone who is transitioning from a 70% chocolate to something darker.

To learn more about chocolate in the 80% range, see my previous article comparing several popular bars here: http://ultimatechocolateblog.blogspot.ca/2014/08/whats-your-favourite-85-chocolate-bar.html.

You can find Zazubean online at http://zazubean.com or on Twitter at: @Zazubean.

Sunday, February 15, 2015

The Ultimate Chocolate Blog in the Media

With over 25,000 views monthly from chocolate lovers worldwide (U.S., Canada and U.K. mainly), the Ultimate Chocolate Blog has been getting a lot of press lately.  Here are some recent links:

1. Article in The Northern Life newspaper: "Tasting chocolate like fine wine?" by Heidi Ulrichsen http://www.northernlife.ca/news/lifestyle/2014/11/25-chocolate-sudbury.aspx on November 25, 2014

2. CBC Up North with Jason Turnbull radio interview called "Celebrating the holiday season with chocolate":  http://www.cbc.ca/player/Radio/Local+Shows/Ontario/Up+North/ID/2644286720/?sort=MostRecent on December 22, 2014.

3. An interview, picture and a recipe written by me in a Sun Media article called "Cocoa play" authored by Joanne Richard and published in the Toronto Sun, Edmonton Sun, Ottawa Sun, Sudbury Star and more, (21 newspapers across Canada) on February 9, 2015:

http://www.edmontonsun.com/2015/02/03/15-reasons-to-have-more-chocolate
http://www.winnipegsun.com/2015/02/03/15-reasons-to-have-more-chocolate
http://www.ottawasun.com/2015/02/03/15-reasons-to-have-more-chocolate
http://www.lfpress.com/2015/02/03/15-reasons-to-have-more-chocolate
http://www.torontosun.com/2015/02/03/15-reasons-to-have-more-chocolate

4.  A reference to the Ultimate Chocolate Blog's regularly maintained list of bean-to-bar chocolate makers on February 10, 2015 in the New York Times article "The Kitchen-Counter Chocolatiers" by Kim Severson: http://www.nytimes.com/2015/02/11/dining/homemade-chocolate-from-bean-to-bar.html?ref=dining&_r=1.

5. A reference to my U.S. bean-to-bar list in Megan Giller's article on Slate.com (March 16, 2015) called "Chocolate Experts Hate Mast Brothers": http://www.slate.com/articles/life/food/2015/03/against_mast_brothers_why_chocolate_experts_hate_the_best_known_craft_chocolate.html

So what's next for the Ultimate Chocolate Blog?  I guess you'll just have to tune in here to see!

Friday, February 13, 2015

Last Minute Valentine's Day Treats: Almond Clusters

How can you make a quick treat on the day before the big day? Simply melt and temper some chocolate (dark, milk, white, your choice) and toss in a good quantity of roasted almonds. With a spoon or fork, scoop out 3 or 4 almonds and place in little clusters on a cookie sheet lined with waxed paper and immediately top with a dry roasted almond.

To learn how to temper chocolate, visit this post: http://ultimatechocolateblog.blogspot.ca/2014/04/there-is-more-than-one-method-to-temper.html

Chocolate Tips:

  • I used Belcolade 80% Uganda couverture chocolate and dry roasted, unsalted almonds for the clusters in the picture above.  However, salted roasted almonds and a semi-sweet (50-65%) or bittersweet (70%) dark chocolate would be a delicious combination.
  • For white chocolate, toss in a teaspoon of ground cinnamon or vanilla bean (dry ground beans, not liquid extract), and add some dried cherries to the mix also if you want to add a splash of red colour.

Last Minute Valentine's Day Recipe: Melt-In-Your-Mouth Hazelnut Dark Chocolate Hearts with Crunchy Rice Cereal


I created this recipe, which appeared in Sun Media publications all across Canada on Monday (February 9, 2015), including the Toronto Sun, Ottawa Sun, Sudbury Star, Edmonton Sun, Calgary Sun and more. It was included with the article called Cocoa Play written by Joanne Richard, which featured an interview with me and a photo. The recipe was only in print (not online), so I've posted it here for you to try!

 
Here are some of the links to the online version of the article that was included with this recipe:
Simply use heart-shaped cookie cutters to
make a special Valentine's Day Treat.
(psst! Keep the leftover pieces all to yourself!)

Wednesday, February 11, 2015

A Way to Use Up that Crunchy PB in your Cupboard: Chocolate Peanut Butter Bars!

If you are like me, you like the idea of crunchy peanut butter, but you don't always enjoy eating it. So it sits in your cupboard for years before you finally throw the jar out. I have found a great way to use up your crunchy peanut butter. And once you taste this recipe, you might just run out and buy another jar!

These chocolate bars absolutely melt in your mouth and have just a little crunch from the peanut pieces in the peanut butter.  If you like a bit more crunch, add the optional Rice Krispies and make it a bark. And if you really want to make the bark special, check out this post on how to add a fun pattern to one side of the bark.

Recipe: Crunchy Chocolate Peanut Butter Bars

 You need:
  • 130 grams of crunchy peanut butter, heated to about 97 degrees F.
  • 227 grams (8 ounces) of semi-sweet chocolate
  • Optional: 1/2 cup of brown rice crisped cereal (oh what the heck, let's just call it Brown Rice Rice Krispies).

Instructions:

1. Prepare your ingredients and tools: Pour your peanut butter into a microwavable bowl. Chop your chocolate and place in a stainless steel or glass bowl (use only glass or plastic if using the microwave, not a double boiler). Line a cookie sheet with waxed paper and set aside. If you want to make designs in your bars, such as hearts or swirls, follow the steps at the bottom of this recipe.

2. Melt and temper your chocolate. Place your bowl of chocolate over a double boiler (1 inch of steaming water in a pot) and stir the chocolate until just melted. Heat slightly more until it reaches 120 degrees F. Then quickly reduce the temperature by placing it over a bowl of ice or ice water until it reaches about 88 degrees.  BE CAREFUL NOT TO GET EVEN A SINGLE DROP OF WATER IN THE CHOCOLATE. Use a paper towel to wipe the bottom of the bowl and your hands if necessary. Set aside on the counter. (For more thorough tempering instructions, click here).

If you prefer not to temper the chocolate over a double boiler or if you do not have a digital thermometer for candy/chocolate, you can microwave it on half power for 2 minutes and stir until smooth, but do not overheat.  If it won't melt completely, microwave for just 5 second intervals and stir just until smooth. Dip your baby finger in it.  If it feels like the same temperature as your baby finger, it is okay to use.  If it is warmer than your finger, stir it until smooth with the bowl resting on a bag of frozen peas, and ice pack or frozen fruit until it feels cool (careful not to let it harden though!).

3. Warm your peanut butter and add it to the chocolate. To warm your peanut butter into a heatproof bowl and microwave for about 20 seconds, just until it reaches 97 degrees F. Pour it into the tempered chocolate and stir.  Add the Rice Krispies, if using. Place the bowl over the ice bath and stir until the mixture cools, reaching just above room temperature (about 75-80 degrees F, but if it starts to harden move the next step immediately!).

4. Pour the mixture onto the waxed paper and spread around quickly with your spoon or a long, flat offset spatula. Let it set on the counter for 10-15 minutes until thickened.

6. Using a straight-edged knife, cut the chocolate into bars or rectangular bark pieces. Place in an airtight container to store (for up to 2 months).


Make it for your Valentine! Place any cookie cutter shape on waxed paper and pour the warm mixture in. 
Let set in the microwave for 10-15  minutes,
then push out of the cookie cutter.

How to turn your chocolate bark into a Valentine's Day treat

Want to make something special for your Valentine this year? Make one of my chocolate bark recipes, or this peanut butter chocolate bar recipe, and dress it up with hearts and swirls or any other pattern you can dream up.

So before you start to make your bark recipe, follow these steps:

Gather the following ingredients and tools
  • 30g (1oz) white chocolate
  • 7.5g (1/4 oz) milk chocolate
  • a large piece of waxed paper
  • a large cookie sheet
Instructions:

1. Lay out a large piece of waxed paper on a cookie sheet.

2. Melt 30g (1oz) white chocolate in a microwave safe bowl in the microwave for 2 minutes on half power. You can use a coffee mug, if you don't have a small bowl. Stir until smooth.

3 Toss a few pieces of milk chocolate 7.5g (1/4 oz) in to the white chocolate to 'seed' temper it.  Stir the mixture until combined and is about the same temperature as the back of your baby finger when you dip it in the chocolate. If this is taking a long time, you can place your bowl on a bag of frozen peas or fruit while stirring to cool it quicker. Remember that you need it to be liquid, so if it starts to lump, stop cooling the chocolate and place in the microwave for no more than 4 seconds, and stir until smooth again.

4. Place your chocolate in a small plastic snack or sandwich bag. Cut a very tiny hole off of one corner.  Twist the bag and push your chocolate to the open corner, careful too not let it drip all over. 

5. Draw hearts, squiggles, dots or whatever shapes you like on the waved paper.


6. Let cool and harden in the fridge for 5 minutes while you start to make your chocolate bark or bars.

7. Once you have that ready, pour it onto the design on the waxed paper and let set. Voila! Your chocolate treat will have a fun design on the bottom of each piece.
Pour the chocolate onto the chocolate hearts and swirls.
After it is cut, turn over your bark to see your design!