Tuesday, April 29, 2014

Barking Mad for Chocolate Bark!


In the last month, I've made chocolate bark so many times, I cannot even count the number of batches. I was inspired when I ran out of BarkTHINS Snacking Chocolate, and truly motivated when my first batch of 70% Salted Pecan Chocolate Bark turned out perfectly.

After Easter weekend, I was feeling like it was time to reduce my sugar intake, so I decided to increase the percentage of chocolate in my bark and change up the nuts. So I used an 80% organic and Fair Trade dark chocolate by Camino and ground roasted and salted peanuts. Once I got used to the absolute bitterness of the bark, I found that I enjoyed it and my sugar cravings were reduced.

I had a family gathering to attend last weekend and I wanted to bring something that would appeal to a wider range of tastes. So I made some Salted Milk Chocolate Peanut Bark with 41% organic milk chocolate (also by Camino) and whole roasted peanuts. This was sweet and salty and oh so delicious.

 
Recipe: Extra Dark Chocolate Bark with Roasted Peanuts and Sea Salt

Here is what you need:

  • Four (4) 100 gram chocolate bars of Camino Organic and Fair Trade brand 80% Panama Extra Dark (or their 70% for something slightly sweeter, or another brand of chocolate - it's up to you)
  • 1 cup of salted and roasted peanuts (grind half, or all of the peanuts, if you like)
  • 1/4 to 1/2 tsp sea salt
Instructions:
 
  1. Lay waxed paper or a chocolate imprint sheet flat on your counter.
  2. Break your chocolate into 1-inch or smaller pieces. 
  3. Melt and temper your chocolate over a double boiler or in the microwave (see this link for instructions on melting and tempering) - remember, 1/3 of one of the four chocolate bars should be reserved for 'seeding' your chocolate while tempering (i.e. when the rest of the chocolate melts and reached 120 degrees F, throw in the broken pieces of the reserved chocolate bar and stir until the chocolate cools to 90 degrees F).
  4. Once the chocolate is in temper, toss in the salt and then add in the ground peanuts and quickly stir.
  5. With a spatula, pour the entire bowl of chocolate onto your waxed paper and spread out as far as possible, as quickly as you can (I like it best when the pieces are very thin!). 
  6. Sprinkle a little more salt on the bark immediately OR for added sweetness, sprinkle hard caramel or Skor bits on the bark while it is wet.
  7. Let set for just a few minutes, and then before the bark hardens, make several triangular cuts.
  8. Place in the refrigerator and let set until the bark is pulling naturally off of the waxed paper (at least 1 hour in the fridge will maintain a nice shine on the bottom of the bark).
  9. Remove from the refrigerator and break up the pieces.  Display in a nice food box or tins. Uline.ca or luv2pack.com offer great options for food & candy packaging.

Follow the same instructions as above for the Salted Milk Chocolate Peanut Bark (Camino has a lovely Milk Chocolate Bar), except do not grind your peanuts (unless you want to!).  Because the peanuts are whole, which makes spreading the chocolate difficult, you must stir, pour and spread the chocolate very quickly in order to maintain a nice shine on your bark.

Monday, April 28, 2014

The Chocolate Tasting Kit: A Great Way to Unleash Your Inner Connoisseur

Eagranie Yuh is a Canadian writer with a keen interest in chocolate. But like most chocolate connoisseur's these days, she has a background that has nothing to do with the sweet stuff. Eagranie has a master's in organic chemistry, which somehow led her to Le Cordon Bleu culinary school in Ottawa, which in turn led her to chocolate.

Nowadays, Eagranie teaches private and public chocolate tasting classes, she writes about chocolate, and she is a Canadian partner and judge for the International Chocolate Awards. And she still somehow maintains a day job as a course architect and editor at ROUXBE online cooking school.

With all of that combined experience, Eagranie has just published her first book and guide called: The Chocolate Tasting Kit. It is described as the "...essential guide to buying, tasting and appreciating fine chocolate." I received one of these kits in the mail and have been testing it out.

At first, I thought about whether or not I would use a 'kit' to taste chocolate, and truthfully, I thought I could not possibly need it. After all, I have been doing this for a long time, right?  I have my own system and have moved on from saving wrappers to writing about chocolate myself. I even give local chocolate tasting classes, like Eagranie does. But when I opened the kit and tried it out with several fine origin chocolate bars, I quickly saw the benefit for anyone who is taking a keen interest in chocolate. And in fact, I saw the benefit for myself to refine my taste buds and cause me to think more critically about the chocolate that I am tasting.

The Chocolate Tasting Kit contains the following tools:
  • a book with background information on chocolate (i.e. where it comes from, how it is made, the difference between fine and mass market chocolate and what chocolate-makers and chocolatiers do with it), as well as guides to: buying chocolate, tasting it and holding a chocolate tasting party.
  • a chocolate-tasting note-pad to assist the chocolate taster in describing each chocolate bar that they taste.
  • 12 flash cards that help prompt the taster when describing the flavour of their chocolate
  • an envelop to keep chocolate wrappers.
I can say with certainty that every one of the tools in this kit would be valuable to anyone who is starting on a journey to becoming a chocolate connoisseur. For instance, a wanna-be 'chocofile' can start learning by reading the overview of chocolate and how to buy the good stuff.

Once the chosen chocolate is in hand, the notepad will prompt the taster to review all aspects of the chocolate they are tasting; from the smell to the colour to the taste and texture. The flash cards assist the taster in describing the flavours that they are experiencing.

Often times, I will have a general feel for the chocolate that I am tasting, but cannot always find the words to describe it.  I found that Eagranie's flash cards and notepad really did help me put my experiences into words.

Another valuable tool was the envelope to hold the wrapper. When I first started seeking out and tasting fine chocolate 10 years ago, I always had piles of wrappers lying around. I would inevitably put them in a Ziplock bag or some other envelope, but they could still be found all around my house in messy piles.  The envelope and the kit box provided by Eagranie offer a great way to store my wrappers.

The Chocolate Tasting Kit is available at several retailers, including Chapters-Indigo at a great online price and some independent retailers. Eagranie is participating in a series of chocolate tasting events to launch the tasting kit. You can find the list on her website here.

Sunday, April 20, 2014

Too much Easter chocolate left in your house?

Is Easter day not yet over and you are already overwhelmed by how much chocolate is left in your house?  Use it to make something delicious! 

I've made all sorts of delectable desserts and truffles with good quality left-over Easter eggs. It is a great and inexpensive way to practise your skills as a chocolatier. And really, the most time-consuming part is peeling the foil wrappers off of each egg (but you can get your kids to do that part). Then, create something absolutely delectable.

Once made, pop the truffles in the freezer and take them out the next time you are heading to a pot-luck or add them to a dessert table at a party that you are hosting!


Here is the quick How-To:

Unwrap all of your leftover eggs (keep a few to enjoy, if you wish), or chop up any large, solid chocolate bunnies.

Make my Milk Chocolate Peanut Butter Truffles Recipe (click here for the recipe) or any of my other truffle recipes, such as the Almond-Nougat recipe if you have dark chocolate bunnies to use up. 


Basic Instructions (go to the recipe for more detailed instructions):
  1. Place your chocolate in a heat-proof bowl.  Then weigh it and see how much you've got!  Remove any extra and ensure you have 8 ounces of chocolate in your bowl.
  2. Measure out your 1/2 cup of whipping cream into a small saucepan.  Bring just to a boil. Pour over the chocolate and stir slowly with a wooden spoon until smooth.
  3. Add 1/2 cup of room temperature (or slightly warmer) peanut butter and stir until smooth.
  4. Let set for 8 hours or overnight (until stiff enough to roll balls).
  5. Wearing cooking or clean dish gloves, roll small balls between the palms of your hands.
  6. Roll each ball in cocoa powder, icing sugar, ground peanuts, Skor bits or finely chopped or shaved chocolate.  Place in mini cupcake papers and then in an airtight container and freeze!  Or consume within 10 days. Best if eaten at room temperature.

Coat your truffles in Skor bits, ground or chopped peanuts,
or more chopped or shaved milk chocolate Easter eggs!
 
And don't forget - tomorrow all that leftover Easter chocolate at the stores will go on sale!  So get down to your local grocer or pharmacy and pick up some really inexpensive chocolate to experiment with - just be sure to read the labels and buy the stuff with no artificial flavourings and NO hydrogenated oils.


Saturday, April 19, 2014

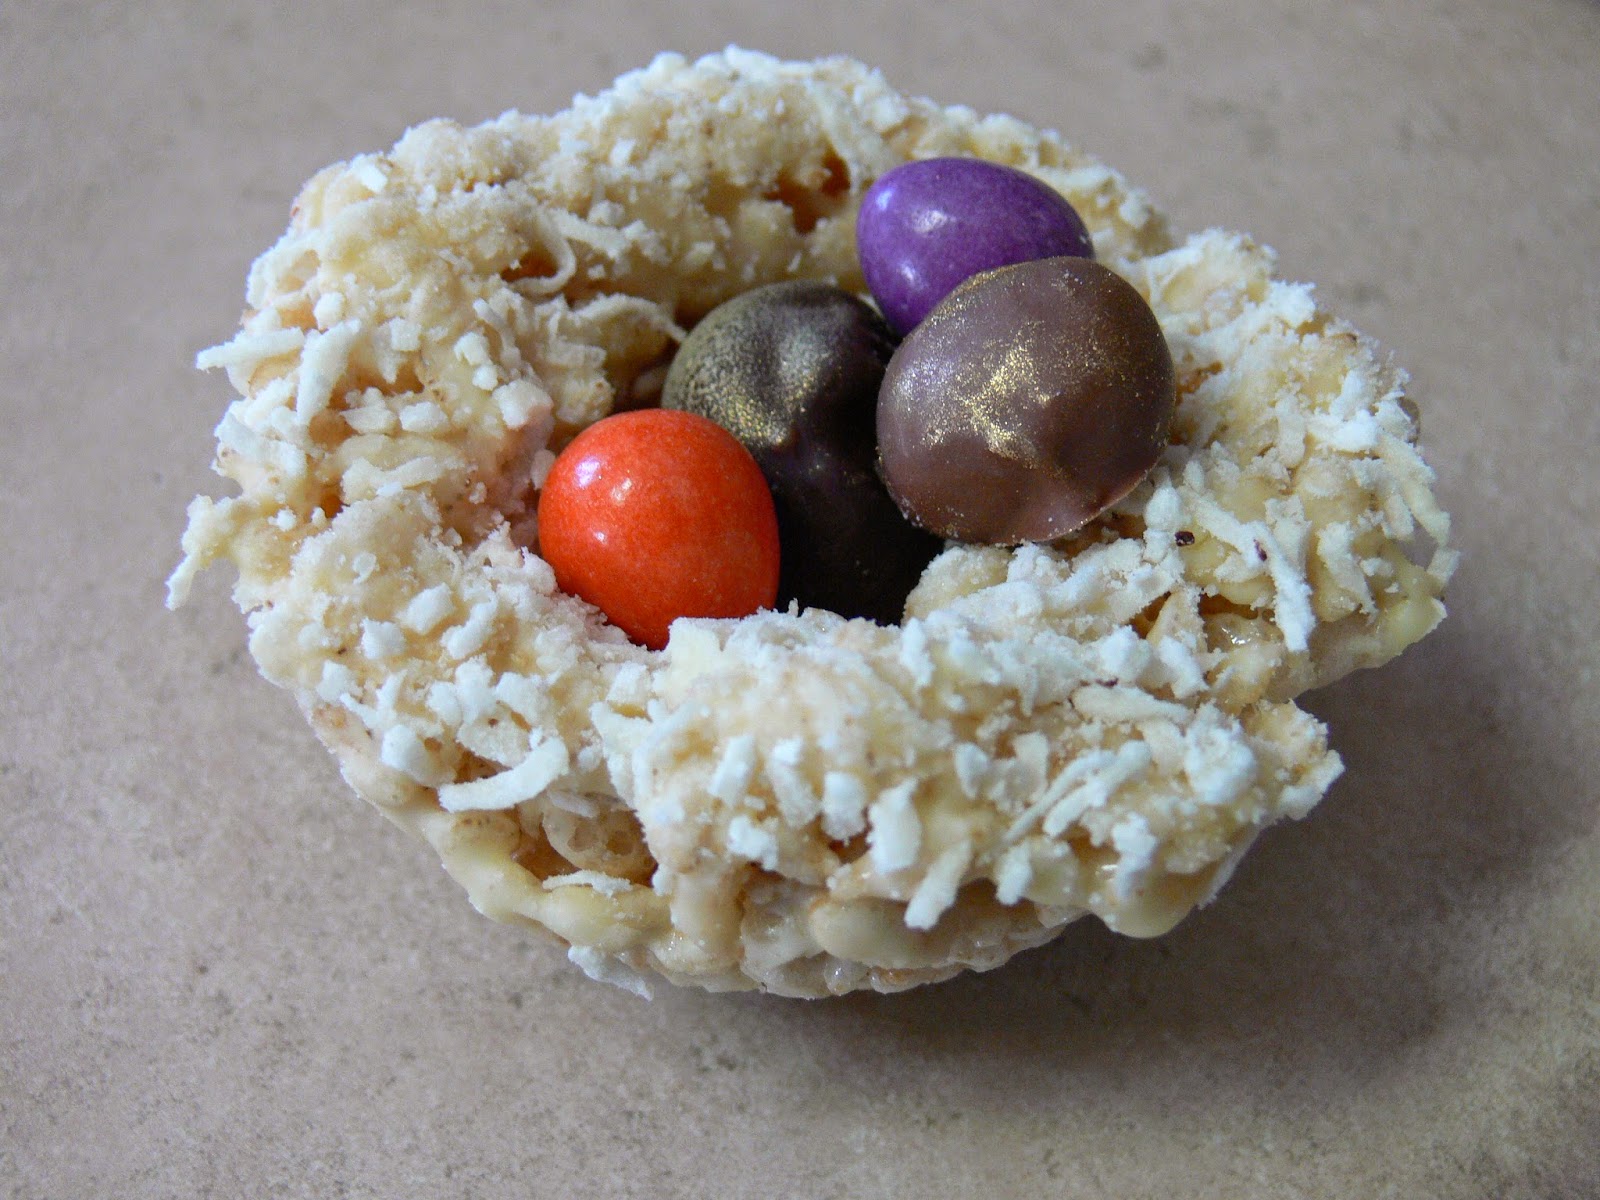
Easter Rice Treat Nests with Golden Milk Chocolate Truffle Eggs

A fun-filled Good Friday afternoon of baking with my five-year old daughter produced wonderful results.  We made rice treat nests, brushed on some melted chocolate, dipped them in sweetened coconut and then filled them with handmade, gold-dusted milk chocolate truffle eggs.

We followed the Kellog's Rice Krispie recipe found here. Then lined some muffin cups with plastic wrap and formed the nests inside using this method.

We melted organic dark chocolate and organic milk chocolate (Camino brand) and brushed it on the upper edges of the nests, then immediately dipped the nest in shredded coconut.  I also brushed a few with melted cocoa butter (by Cacao Barry) and dipped those in coconut, which lessened the sugar content, but not the taste.  In fact, the taste of pure cocoa butter with coconut was surprisingly delicious.

Once the nests were made, we took some milk chocolate truffle mix and formed small, egg-shaped balls between the palms of our hands (find some chocolate truffle recipes here). Then we dipped them with a fork in both the melted dark and milk chocolate. Once they were set and hardened on waxed paper, I brushed them with a little gold dust. We placed them in the nests with a few Smarties Easter Eggs and Voila!  we had fun and pretty little bird's nest for an Easter dessert.

My daughter also got excited about dipping 'stuff' in chocolate, so we kept on going and this was the result: chocolate dipped apple pieces, chocolate dipped strawberries and chocolate dipped rice treat eggs!

Rice treats and chocolate always offer easy and fun things to do at Easter with kids.

Happy Easter everyone!

Sunday, April 13, 2014

Dark Chocolate Bark with Roasted Pecans and Sea Salt (Recipe)

A few weeks ago, I purchased a bag of BarkTHINSSnacking Chocolate, a delicious sweet and salty dark chocolate bark with crunchy pumpkin seeds. I really enjoyed this snack and sadly, I ran out earlier this week. Since it takes 2.5 hours to drive to the nearest Costco from my town on Manitoulin Island, there really was no chance of buying more any time soon. So yesterday, when I found that I had some leftover tempered dark chocolate on hand, I decided to make my own version.

Instead of pumpkin seeds, my version included what I had on hand, which was some freshly roasted pecans and Canadian sea salt by Vancouver Island Salt Co. And do you know what? I enjoy these as much as the original! The hint of sea salt really brings out the flavours of the chocolate and the nuts, and it somehow makes the 71% dark chocolate seem sweeter. The fun is in the crunch and the unconventional shapes (solid chocolate bars and their rectangular-shaped pieces seem so boring to me now), so every piece is a surprise. Try it! You may never eat a 'normal' chocolate bar again.

And now for this super simple recipe...

Recipe for Dark Chocolate Bark with Pecans and Sea Salt

You need:

  • 12 ounces of dark chocolate (you can use 50% to 75% dark chocolate, I used CacaoBarry's 71% Organic dark chocolate, which was a perfect match with sea salt. See below for my tips on where to buy chocolate)
  • 1 cup of raw whole pecans
  • pinch of sea salt
  • 2 tbsp. olive (or other) oil
  • 1/4 tsp sea salt, plus a pinch for the pecans
  • waxed paper

  •  
To roast and prepare the pecans:

1. Preheat your oven to 350 degrees F. 

2. Place the pecans single layer on a parchment-lined cookie sheet. Pour on about 2 tbsp. of olive oil (or other oil of your choice) and stir with a spoon or your hands to coat the pecans in oil. Lightly sprinkle on sea salt.

3. Bake in the centre of the oven for 10 minutes.  Remove pan and stir the pecans to turn them over.  Then spread them back out (single-layer) and put back in the oven.  Bake for five more minutes and check to be sure nothing is burning. Add another five minutes as necessary, constantly checking the pecans. The overall cooking time is about 15 to 20 minutes, depending on your oven.

4. Take out and let cool.

5. Finely chop, crush or grind half of the pecans (1/2 cup). I used my single-serving cup on the Ninja blender for a few seconds, but I also could have used the Cuisinart handheld immersion blender with the chopping device attached. If you do not have a chopper or grinder, simply place half the pecans in a Ziplock bag and roll a rolling pin over the bag on the counter or on a chopping board until you have crushed them to a fine consistency. Set aside with the other half cup of whole pecans until you are ready to use them.

To make the chocolate bark:

1. Lay out a long piece of waxed paper on the counter on a large cookie sheet.

2. Melt and temper the chocolate. For tempering instructions, see here.

3. When the chocolate is in temper (i.e. sitting at about 88 degrees F), toss in the crushed and whole pecans, as well as the 1/4 tsp sea salt and briefly stir until well mixed.

4. Immediately pour the chocolate mixture onto the waxed paper in a long strip and quickly spread around with a spatula to a thin consistency (see picture to the right).

5. Let set slightly (until the chocolate is still soft, not hard, but no longer 'wet'), this should only take a few minutes so watch your Chocolate Bark carefully. Then take a large sharp knife and cut rectangular and triangular pieces.  DO NOT attempt to remove or lift the pieces. Let the chocolate set until it is completely hard and begins to lift on its own from the waxed paper.  That way you will have a shiny bottom side to your bark. If your room is warm, you can carefully place it in the fridge to set it for up to one hour.

6. Once set, remove each piece from the waxed paper and place them in an airtight container to store. If you had put it in the fridge, let your bark come back to room temperature before sealing in a container. These should keep for months at room temperature, like any chocolate bar.
Serves 1 person daily for 12 days or serves 12 people for one day - your choice! 


Tips:

I spread my chocolate bark onto 'impression mats'', which gave the back side a textured look.  You can buy impression sheets online on Golda's Kitchen website at: http://www.goldaskitchen.com/merchant.ihtml?pid=11618&step=4.

Where to buy your chocolate:

Organic & Fair Trade

Although CacaoBarry's chocolate is designed for professional chocolatiers, pastry chefs and bakers, you can get your hands on a bag of their organic 71% dark chocolate at a variety of wholesalers, including Vanilla Food Company (click here).  

The Camino brand, by La Siembra cooperative makes chocolate for professionals, so if you have a business, I recommend that you check them out. Their semi-sweet couverture pairs well with sea salt.
www.lasiembra.com/camino/.  Also, for the home baker, their 100 gram (3.5 oz) 55% dark chocolate bars (or chocolate chips) are now available at many grocery stores and health food stores in Canada, or can be purchased online. In the U.S., you can find Camino 55% and 71% chocolate chips here. You will need at least four (4) 100 gram chocolate bars (or two bags of chips) to make the recipe above.

Non-Organic Chocolate (with NO artificial flavours) at a Great Price:

A non-organic 1 kg box of Callebaut Semi-Sweet Chocolate Couverture is available on Golda's Kitchen website for $17.25, which would make nearly 3 batches of chocolate bark.

President's Choice Extra Dark 72% Chocolate is great for home-made chocolate treats. Each bar has 300 grams (about 10.5oz), so be sure to buy two and watch for regular sales at your local supermarket!  If you do not live near a store that carries President's Choice, Lindt makes a dark, semi-sweet chocolate bar in about the same size. 

For beginners, the Lindt brand is a great go-to chocolate for practising your skills as a wanna-be chocolatier. Buy several of their 100 gram dark chocolate bars when they are on sale and test out the recipe above - you won't be disappointed!

Monday, April 7, 2014

There is more than one method to temper chocolate

In order to have shiny, streak-free chocolate, chocolatiers use a number of different methods to temper their chocolate. Tempering is a science that needs to be applied. You do not need all the scientific details, but in order to coat chocolate truffles or make your own chocolate bars at home or for your business, you do need to learn how to temper chocolate so that your confections looks shiny, beautiful and, well, appetizing.

When I first started, I typed out the first method below and printed it.  I then taped it on the inside of a cupboard door in my kitchen.  I now have the temperatures memorized, but for a long time it was a great reference and quite handy.

To heat your chocolate up to the maximum temperature (as per the below chart), place it in a stainless steel or glass bowl over a double boiler. If you do not have a marble slab, you can cool the chocolate over a bowl of ice.  Keep your pot of water on the stove to quickly reheat it to your final 'working' temperature. But be aware, and this definitely needs capitals: DO NOT GET A SINGLE DROP OF WATER IN YOUR BOWL OF CHOCOLATE!  Keep a cloth on hand to dry off the bottom of the bowl and your hands very well every time you touch the bowl.  One drop of water will seize the entire batch. See below for a tip on what to do if your chocolate seizes (i.e. hardens, lumps and becomes way to thick to work with).

Here is your temperature chart and some easy methods for tempering chocolate:

Tempering Chocolate (with marble slab or over an ice bath):

Heat white, milk and dark chocolate to different temperatures:  

Step 1. Heat dark chocolate to 120°F, milk chocolate to 115°F, and white chocolate to 110°F.

Step 2: Then let it cool:  dark to 82°F, milk to 80°F, and white to 78°F.

Step 3: Then reheat it to 90°F for dark, 86°F for milk, and 82°F for white.


Tempering Chocolate with the Seed Method:

Step 1. Heat dark chocolate to 120°F, milk chocolate to 115°F, and white chocolate to 110°F.

Step 2: Then let it cool by tossing in ¼ of the amount of already tempered chocolate and stirring until it cools to F for dark, 86°F for milk, and 82°F for white.  For instance, if you are melting 12 ounces of chocolate, throw in up to 3 ounces of chopped tempered chocolate to cool the 12 oz of melted chocolate. If it cools beyond these temperatures, reheat for five seconds in the microwave until you get it back up to this point.  Use the baby finger method (see below) along with a thermometer to ensure the chocolate is in temper. 

TIPS ON CHECKING IF CHOCOLATE IS IN TEMPER:

1.       The best measure to know if chocolate is in temper is the back of your baby finger.  If the temperature of the chocolate is the same as the temperature of the back (or knuckle) of your baby finger, the chocolate should be in temper. If it is too warm, it will be streaky. If too cool, it needs to be warmed in the microwave for 5 seconds. If you have been stirring vigorously with one hand, use the baby finger on the other hand because the hand you have been stirring with will be warmer than normal.

2.       Also check the look of the chocolate – is it shiny?  If so, it is likely in temper.  If dull, it is not.

3.       Spread a thin/tiny amount on a piece of wax paper and put in fridge and check in 30 seconds.  Any streaks? If so, it is not in temper.  If shiny, it is in temper.  Make sure the chocolate in your bowl has not cooled too much while you do this or you may need to reheat a little (no more than 5 seconds in microwave).
 
Tip: If your bowl of chocolate seizes, you can only salvage the chocolate by turning it into a truffle, glaze or ganache. If you are melting 12 ounces of milk chocolate and it seizes, bring 3/4 of a cup of whipping cream just to a simmer in a pot on the stove and pour over the chocolate and stir until smooth. If it is 12 ounces of dark chocolate, use 1 and 1/4 cup of cream.  If you want to make a glaze, heat water just to the boiling point and our over chocolate (1/2 cup for milk chocolate, 3/4 cup for dark chocolate). You can also use Baileys or coffee liquer or whatever you like.  Let it sit to set for 8 hours to make truffles or immediately pour the smooth mixture over a cake as a yummy icing or glaze.

Peanut Butter and Milk Chocolate Truffle Recipe - delicious!


These are not your average peanut butter balls! Consume these rich and delicious peanut butter truffles within 10 days, or freeze immediately for consumption at a later point in time.

For the Truffles You need:

·       8 oz of good quality milk chocolate, chopped
·     1/2 cup of heavy cream, (ie. Whipping cream)
·       ½ cup all natural peanut butter (I like MaraNatha Smooth Organic Peanut Butter or Kraft Natural Smooth Peanut Butter)

 
For the Coating You Need:

·   12 oz milk chocolate, chopped & set aside 3 ounces for ‘seeding’ – see my tempering chocolate page

OR

·  1 cup of Skor bits AND/OR shaved milk chocolate or finely chopped or ground peanuts (to grind, whirl in blender for a few seconds)
  
To make the truffle mix:

1.  Place the 8 ounces of chopped chocolate in a heatproof bowl.

2. Pour the cream into a small saucepan and place on the stovetop on medium-to-high heat. Bring just to a boil (do not let boil, so watch it closely).

3.  Pour over the chopped chocolate and stir slowly with a wooden spoon until smooth. If the chunks are not melting well, place over a double boiler (if using a stainless steel bowl) or in the microwave (if using a glass or plastic bowl) for 10 second intervals and stir until melted.

4.  Warm peanut butter in microwave for about 20 seconds – until just warm (not hot).

5.  Stir the peanut butter into the cream-and-chocolate mixture. Stir until smooth.

6.  Place a lid (or plastic wrap) on the bowl and set aside for 6 to 8 hours, until set (i.e. thick enough to roll balls).

 
To make the truffle balls:

1. Once set, scoop out small amounts of truffle mix using a spoon and roll into balls.  Choose whatever size you like (the recipe makes about 40 to 50 small truffles, or 30 to 40 large truffles). TIP: Use food preparation gloves to prevent heat transfer (to prevent melting!) and to keep your hands clean.

2.  Place on waxed paper and cover with plastic wrap while you prepare your coating.
 

To coat the truffles:

You have a few options to coat your truffles.
 
1. Dip them in melted and tempered milk chocolate to have a shiny, milk chocolate shell. If you do not know how to temper chocolate, visit my 'Tempering Chocolate’ page for instructions for melting and tempering your coating chocolate.
 
OR
 
2. Dip them in the in the tempered chocolate and immediately roll them in ground peanuts, Skor bits or shaved chocolate. I whirled some Skor bits and roasted peanuts in a blender for a few seconds (do not blend for too long or you will have peanut butter!). This gives the truffles a lot of additional volume and a tasty crunchy, crispy shell.
 
OR
 
3. Skip the dipping, and make it simple by rolling your truffle balls in the chopped peanuts, Skor or shaved milk chocolate. These still taste great and add a flavour punch to any dessert tray, without all the extra work! 


Note:  The recipes that I post on this blog are a result of experimentation in my commercial kitchen until I get just the right combination. There is no reference on this recipe, because it is my own creation!